Provided By www.PirateCity.NET (Formely) www.Latestuploads.com
Instructions :
Disable any virus guards/Firewalls/Windows Smart Screen first
install Activator
When the setup finishes it will stuck at the end ( i dont know why :/)
Minimize (Setup If Stucked) and go to ‘C:\Program Files\KMSpico’ folder
Now wait till Setup closes itself (this will take some time , if it doesn’t close Within 5 Min's. kill it using task manager)
Now open ‘KMSELDI.exe’ from Activator Installation Directory folder
Click (tokens backup) button which is with a arrow facing down icon (Click yes in next message box)
After that click (Red button)
Wait till it says program completed , activator will close itself ( if it freezes at some point , use the alternate KMS Activator we have Provided)
Now you are Done !
Check your Windows 8.1 computer properties :D
Windows Is Activated !!!
Restart To Remove If Watermarks Are Still There...
It often happens when you throw your laptop around like a nokia 1100 that your laptop stars showing strange colors on the lcd like this...
The proper method of fixing it is to repair or replace the lcd which ofcourse costs alot of the piggy bank.......
But to make a temporary fix to your lcd which costs only the movement of your sholuders will fix it.
Like the idea?/ I thought so
Put one hand on the lcd screen and the other on the back of the screen and PRESS it.
It fixes the issue........and believe me it happened to me.............i tried it and its been a long time since i saw those strange and somewhat irritating colours on my screen............
If it doesnot fix the issue...........take it to a repair centre.
1) Download Phoneix Service Software 2) Install it on your pc . 3) Download & Install Nokia ovi Suite . Step 2
1) Connect your phone with your pc via Data Cable. 2) Select "Nokia OVI Suite" on your phone when prompted . 3) Nokia OVI suite should appear on your desktop ; Close it . 4) Now run Phoneix .
Step 3
1) You'll see no connection at the connection box. 2) Click on it you'll see something like USB 1 USB 2 etc. 3) Now click on the connection which looks like USB X -RM-XXX 4) USB 1,2,3... can vary depending upon which usb port you are connecting . 5) And RM-XXX is your phone's RM version. You can also get it by dialing *#0000# on the home screen. 6) In my case it looks like USB-2-RM-704. 7) Click on your connection (USB X-RM-XXX). 8) Now you will see Ready at the bottom left corner. 9) your phone is now connected.
Step 4
1) Now goto FILE => Scan Product . Or just press Ctrl+R on the main window. 2) You'll get your phone's details on the screen , right beside the READY dialogue .
Note 2 : In the next step you need the Product Profile of your phone. which looks like rm_xxx.ppu .
You can download it from google or just post your phones RM version as comment along with your mail id to get it right inside your mailbox. Download it and save it anywhere you can access easily.
OK lets back to the topic.
Step 5
1) Now goto Product => Product Profile . 2) A new window will come up named Product Profile. 3) Now click on Browse and choose your product profile ( What we talked about at note 2 ). 4) You will see a table. 5) Now click on Activate button. 6) Scroll down to the line number 48 in table below ( line no. 28 in case of s40v3 phones ). 7) You'll see a field named Java TCK support. 8) And the default value is Java TCK - off . 9) Double click on the value and select Java TCK - on . 10) Click on Write .
Step 6
1) Switch off and on your device. 2) Warning TCK flag set.
Thats it you have successfully hacked your phone . Ok now come to the next point. To be able to minimize apps we have to do one more step . Editing the app which you wanna minimize.
Step 1
1) Download the java app on your pc. ( with .jar extension ) 2) Now Right click on the app & Open with any zip reader. ( Like Winrar , 7-Zip etc.). 3) Inside that you'll get a folder named Meta-Inf . Open it. 4) You'll get a file named MANIFEST.MF. 5) Edit that file with notepad . ( simply double clicking the file will do that. ). 6) Now at the very end add this line exactly in the following case order. 7) Nokia-MIDlet-no-exit: true . 8) Now save the file by pressing Ctrl+S and exit the editor. 9) The zip archive will ask you for updating the archive . Press yes to update .
Step 2
1) Now send the app to your device via Bluetooth or Data Cable . 2) Run the app . 3) Press the Home key on your mobile . ( I mean the red key used for exiting the apps . ) 4) Thats all your app is minimized. 5) Run it again by going to the app . And quit it by the apps quit option.
Download links :
I'll update the links very soon.
Successfully tested on --- Nokia 5130 Xpress-Music Nokia 2730c Nokia C2-00 ( with limitation of one app at a time ).
Warning : Do at your own risk..... Though its the most safe method. This tutorial is for educational purpose only . I'm not insisting anyone to hack nokia phones .
Hope you enjoyed and Best of luck............ Follow or join via email for the updates in your mailbox..
I'll post screen shots and a tutorial video on the basis of your response or popularity of this post.
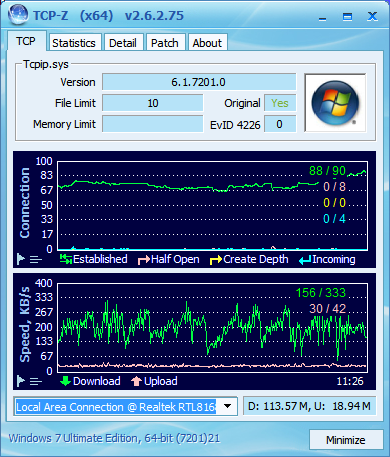
Ever wondered why your torrent download speeds don’t go as high as your maximum bandwidth? Well that can be due to a number of factors, one of which is the limit on number of half open TCP/IP connections you can have at a time. Don’t know what is that? You don’t have to, just follow this quick guide to learn how to bypass that limit and significantly boost your download speeds.
To keep things simple, Half Open connection limit is imposed by Microsoft to prevent certain type of malware from infecting your system. Unfortunately, this also handicaps your P2P download speeds. The limit is a maximum of 10 connections at a time, but you can easily increase it by patching thetcpip.sys in your system directory, but there is a better way to do it.
TCP-Z is an awesome tool that lets you increase the maximum limit of open connections you can have to anything you like. But its not recommended to go over a certain value because speeds may start to suffer then. It works for all versions of Windows included XP, Server 2003, Vista, Server 2008 and Windows 7.
Here is a quick way to boost your limit:
Download TCP-Z and extract it somewhere on your hard drive.
Navigate to the folder, and run the executable compatible with your operating system. For 32-bit Windows, select tcpz.exe and for 64-bit Windows opentcpz64.exe.
You need to right click and select Run as Administrator if you are on Vista or Windows 7.
After a couple of prompts, you would land on the window displayed above.
Click the Patch tab and set the slider on the top right to what you want. Its usually recommended to keep the maximum limit between 50 and 100.
Hit the Apply button and now you’re all set.
One thing you need to keep in mind is that the limit is just patched in your RAM. You’re tcpip.sys file is intact, as it should be. The patch would be cleared when your OS restarts.
Make sure you subscribe to my blog for more torrent tips and tricks on various other things.
Youtube – You know that site with videos and all. Yeah! It turns out that its quite popular and you happen to visit and use it quite often. Instead of just searching and playing here are some top Youtube URL tricks that you should know about:
1. View high quality videos
Youtube gives you the option to switch to high quality videos for some of the videos, however you can check if a video is available in high quality format by appending ‘&fmt=18′(stereo, 480 x 270 resolution) or ‘&fmt=22′(stereo, 1280 x 720 resolution) for even higher quality.
2. Embed Higher Quality Videos
While the above trick works for playback, if however you want to embed hig quality videos you need to append “&ap=%2526fmt%3D18″ and “&ap=%2526fmt%3D22″ to the embed url.
3. Cut the chase and link to the interesting part
Linking to a video where the real action starts at 3 minutes 22 seconds, wondered if you could make it start at 03:22? You are in luck. All you have to do is add #t=03m22s (#t=XXmYYs for XX mins and YY seconds) to the end of the URL.
4. Hide the search box
The search box appears when you hover over an embedded video. To hide the search box add ‘&showsearch=0′ to the embed url.
5. Embed only a part of Video
Just append ‘&start=30′ to skip first 30s of the video. In general you can modify the value after start= to the number of seconds you want to skip the video for.
6. Autoplay an embedded video
Normally when you embed a Youtube video and load the page, the player is loaded and it sits there waiting for you to hit the play button. You can make the video play automatically by adding ‘&autoplay=1′ to the url part of the embed code.
7. Loop an embedded video
Append ‘&loop=1′ to make the video start again without user intervention after it reaches the end.
8. Disable Related Videos
Publishing your content in the form of Youtube video? Don’t want people to see other people’s content that may be related but may as well be in competition to you? Just add ‘&rel=0′ to the end of the url part of the embed code and you just turned off the related video suggestions!
9. Bypass Youtube Regional Filtering
Some videos are only available in certain parts of the world. Your IP Address is used to determine your location and then allow or deny access to the video. Change the url from http://www.youtube.com/watch?v=<somecode> to http://www.youtube.com/v/<somecode>
10. Download Video
Although not inherently a youtube trick but useful all the same for downloading videos. Just change youtube to kickyoutube in the url of the video and it will take you to kickyoutube.com with all the options for downloading the video you were watching.
Do you know of some similar Youtube URL tricks and hacks? Fire them in comments
You have to admit, Microsoft has taken a sizable gamble with Windows 8.
Some commentators say that the company simply has to change the way it operates if it wants to gain any traction in the tablet and smartphone market, and with the new operating system's touch-oriented interface, it has certainly started down that path.
With the Windows 8 UI, otherwise known as Metro, Windows has undergone a radical rethink in terms of both operation and interactivity.
For us desktop users, it represents a massive change from what we've become accustomed to over the years. Gone is the desktop as we know it and, more jarringly, gone is the Start menu that we've come to love since the somewhat dysfunctional days of Windows 95.
Windows 7, but better
But there's no need to worry, since all we're looking at with Windows 8 is essentially a re-skinned version of Windows 7 with some fancy new GUI components dropped in on top of it. As Microsoft itself says in the reviewers' guides it sent out to the press: it's Windows 7, only better.
OK, Microsoft's developers have done more than just update the graphics, so that glib assessment is rather over-simplifying things, but the basic point is that you won't be losing out on any of the functionality you enjoyed with Windows 7, which has evolved into one of Microsoft's finest operating systems to date.
The first thing you need to be aware of is the powerful new user menu, in place of the old Start menu. It's a simple right-click away from any screen, whether you're using the desktop or the Metro interface, and contains quick links to all the most important administrative functions you could possibly need when setting up or keeping your PC running smoothly.Some things may seem like they have been hidden, but as soon as you get used to the new layout, it will all become second nature.
From here you can dive straight into the likes of the Device Manager or Disk Management dashboard, and start tweaking things immediately.
Microsoft has obviously spent time deciding which of the most important services it wants to put in this menu, and if an administrative feature has been left out of the one-click system, it will probably only be a second click away - in the Control Panel, for example.
If you prefer, you can drop all the serious admin tools into the Metro interface straight away (we explain how under 'How to bring out the admin tools'), so you can jump directly into whichever one floats your boat from the Metro start screen.
There are a few more tools in this group than there were in Windows 7, but for the most part these aren't new options - just ones that have been moved in from elsewhere.
For example, the Disks section of the Components/Storage category shows exactly what make your hard disk is, what partitions are running on an individual storage drive, and how full they are. If you want to know exactly what's making your PC tick, this is the place to go for all the necessary info.The System Information option is a particularly useful page, giving detailed specs, locations and builds for the various kinds of software and hardware that make up your PC. Clicking on any of the categories will give you a full rundown of how things are running.
Clean and polish
Speaking of playing around with your machine's disks, Microsoft has also moved two of the most commonly used disk management utilities under the Administrative Tools umbrella: namely Disk Cleanup, and Defragment and Optimize Drives.
These will both be familiar to anyone who's used any of the last few generations of Windows operating systems, though the Defragment and Optimize Drives tools have now been reconfigured to cope with the increasing popularity of solid state drives, and will no longer try to persuade you to wear them down with unnecessary defrags.
Another admin tool that remains unchanged in the new operating system is Windows Firewall with Advanced Security. Here you can amend any rules associated with your current firewall settings, and create, import and export different policies wholesale.Disk Cleanup is the same old one-stop shop for quickly clearing up after the vagaries of the operating system, and removing the temporary files that make such a mess of your storage drives.
You can also jump straight into the Network and Internet Diagnostics page, which gives you immediate access to the Printer Troubleshooter.
System Configuration, which you may know as msconfig, has been moved into the Admin Tools area. For years, this utility has been our go-to option for altering boot options from within Windows, such as removing the boot GUI or starting in diagnostic mode. It was also where we decided what programs would load into the OS at startup.
No longer. The Startup tab in the Release Preview now displays a link labelled 'Open Task Manager'. That's right, it's had a promotion. You can use the Startup tab to see what impact each app has on startup, and disable or enable them with a couple of clicks.
High performance
That's not the only new addition to the Task Manager, though. The Performance tab has also received a serious overhaul, and now gives you full performance information about not just your CPU, but your RAM, storage and networks (LAN and Wi-Fi) too.
The App History tab also provides valuable details, but only delivers reports on Metro applications that have been running. This will be useful in terms of figuring out which of the always-polling apps is hitting your 3G dongle the hardest.
Microsoft has made great strides in improving the support it gives power users, and has made the necessary information and applications easier to find than ever. It has provided a host of options to help you keep on top of your OS and tailor it to your specific needs, and Windows 8 gives you pretty much all the tools you could ever need.
Transferring files
Moving data around your hard drive or between PCs is one of the most common computing tasks, and while it's not particularly exciting, Microsoft has updated Windows 8 to make it faster and easier.
The most obvious change is the new interface that pops up when you start moving files and folders. Initially it looks like the standard bar filling up, but if you click for more details it reveals much more information.
You'll see a dynamic chart detailing how fast the transfer is going, and a history of its performance. You can pause and resume file transfers too - something not possible in Windows 7. Transfers will also pause if the device goes into sleep mode, enabling you to continue on restart.
Hidden enhancements mean that file copy interrupts are now saved until everything else has been completed. If there is a possibility of copying over an existing file, for example, it will be held over until the end, and wont hold up the queue waiting for the user to click 'Continue'.
How to bring out the admin tools
On the Windows 8 Metro Start screen, bring up the Charms bar from the right-hand side of the screen and click 'Settings'. Now select the Tiles menu and slide the bar that says 'Show administrative tools' to the right. Now just tap anywhere on the main screen to remove the Charms bar, and the administrative tools will be displayed.
When these tools appear, they may be mixed in with other shortcuts, but we'll show you how to tidy them up. You can group icons together on the Start screen with a few clicks.
First minimise the icons by hovering the mouse over the bottom right corner and clicking the minus symbol. You can now see the individual groups by right-clicking on them.
When you right-click, a bar will appear at the base of the screen giving you the option to 'Name group'. Once you've entered a name, you can zoom back into the Start screen and move individual icons between groups.
Return to the minimised view and you can move entire groups around by dragging and dropping them into your preferred place.
How to back up files
Windows 8 makes it easier than ever to quickly back up important files. The new File History app enables you to select a device to use for automatic backups for your desktop and Libraries.
First, enter the Control Panel and start File History. Alternatively, with a fresh USB flash drive, Windows 8 will enable you to get started with File History straight away.
If you haven't plugged in a USB stick or other storage device, now is the time to do so. The drive will appear in the window, and File History will be switched off. Click 'Turn on' to begin syncing content to the drive.
You can exclude a folder by selecting it in the 'Exclude folders' option, and add Libraries by creating new ones and filling them with folders.
The advanced settings will detail how long to keep outdated versions, and how often to back the whole lot up. If you delete a file from your main drive that you then need to back up, you can use Restore Personal Files to select an appropriate restore point.
You can even drill down through the backups to see which files are in each option.
Top six tools for setting up and looking after your PC
1. Startup
Once hidden within the depths of msconfig, the Startup tab now lives in the new Task Manager. It still has the same level of functionality as before, enabling you to customise which programs load on boot, but it's now much easier to access. You also travel directly to the file location to see a rundown of the impact it has on your boot.
2. Performance
This is another example of the improvements Microsoft has made to the Task Manager. Previously you only got a graph of CPU usage, with a little extra detail about memory. Now there's information about everything from processor speed to the read and write speeds of your drives. This will give you a great idea of how your machine is performing.
3. System information
If you don't necessarily want to know how your machine is performing, but are looking for the details of your PC's components (from a software or hardware perspective), the System Information screen is perfect. It will give you the full lowdown on every facet of your machine, from the drivers for your mouse to the layout of your drive partitions.
4. Windows Firewall
Nothing has really changed with the latest iteration of Windows Firewall and Advanced Security. It's still the place to go to fully customise your firewall settings, whether you want to import new exception policies or diagnose any kind of network/security problems. It also enables you to monitor how your current network connection is configured.
5. Boot into Safe Mode
Boot times in Windows 8 have improved, but with an SSD installed as a boot drive it can be tricky to boot into Safe Mode. Luckily, you can access it via Advanced Boot Options, which is accessible through the extra settings on the Charms bar. If you hit 'Advanced Startup' under the General tab, the PC will restart into Windows 8's debug mode.
6. Reset Windows 8
Your PC now has a function similar to the factory reset option on your smartphone. Again it's under the PC settings screen on the Charms bar. It gives you two options - you can either refresh the PC without losing any of your personal files (like photos and music), or you can perform a total system reset, which will revert your PC back to its original state.
Windows 8 is finally reached to our PCs, as final version has been outed back in October. The latest operating system in Microsoft Windows series, has got the mixed feedback across their users. According to the views of some users, Microsoft Windows 8 is good for Phones, and touch screen devices such as Tablets. The reason is obviously strong, as Microsoft engineers have decided to remove the start button, and replaced it with that (boring) Metro UI. Well, i would like to come back to the topic, for that i have decided a tutorial for you ‘our beloved readers’.
Recently we wrote about outstanding features of Windows 8, and also a tutorial was compelled in which steps of changing the size of Windows 8 Borders were mentioned. In addition of that i also showed you process to install Windows 8 from USB on any Tablet, Laptop, and PCs. Today, this tutorial is also somewhat similar, but in this guide, i will be discussing about process to install and run Windows 8 from an External Hard Disk Drive. You might wonder, why you would install Windows 8 into external disk, when you can install same in your local disk? Let me tell you the fact. Sometimes, you want to test Windows 8 pro from an external disk, without even touching the OS installed in your HDD. If you decide to do so, then you will able to boot the Windows 8 OS directly from that disk when you just connect it to the notebook. Suppose, you disconnect the disk from your notebook or computer, then you will able to use your PC normally as you were using.
For this process, we have here compelled the tutorial for you, in which you can run and install Windows 8 directly from an external hard disk, for that i am using VHD (Virtual Hard Disk) which i think as best method. This is always can considered as best way, if you want to test the OS without needing an additional PC just to test the Windows 8. Well, there are many ways to achieve this and it is not easy to tell which way is best, but i believe VHD way is best and easy and safest way to try.
Procedure to Run Windows 8 from External Hard Disk
What’s Required? Please check in:
External Hard Disk minimum of 40GB storage capacity
A 8GB pendrive, along with Windows 8 Pro DVD or ISO image which is needed to make Pen Drive bootable.
You will need to create the VHD disk.
Backup your data before you proceed.
Part 1: Creating VHD
Step 1: Download Windows 7 USB/DVD Download Tool from this link and install it and create the bootable pen drive.
Step 2: Now open the Computer Management and then select Storage and select Disk Management. You should see all the disks here in your computer.
Step 3: From the drives showing, you need to select the disk which is External Disk. After selecting that go to ‘more action’ option and then select ’create a VHD’.
Step 4: Now, in next screen you will need to select the option to save the vhd disk and select the name of vhd disk and choose the appropriate name.
Step 5: Now, just close the Computer Management and then re open it, this would Initialize the VHD (Virtual Disk.
Step 6: Next, just right click on the drive and then unallocated space>new simple volume.
Step 7: The wizard would start and then just select ‘next’
Step 8: Now, just assign the letter and again click next. After that click on Finish and this will create vhd disk. It was easy right?
Now, you will just need to remember the drive letter you used for vhd disk before proceeding with the next final steps.
Part 2: Installation Steps
Step 1: Now, plug-in the USB drive and then restart the computer.
Step 2: From the boot menu configure it to boot from USB Drive and then run the Windows 8 Pro Installer.
Step 3: Select the option ‘Install now’ and when you reach to the page where hard drive should be selected, stay with that page and you won’t need to select any disk there, instead press the combination of SHIFT+F10 which will open a console just because we want to attach our VHD which wee created in last part.
Step 4: When CMD window opens up, then just type DISKPART and attach the VHD with following commands:
P.S. In my case VHD drive letter was you just have to decide where you saved the VHD in first part. If you’re interested to find the drive letter of your VHD, then just type “CD x:” and X stands for drive letter which you can try for multiple letters.
Step 5: ALT+TAB to see the list of disks and then Refresh. Now you must see the VHD. Just select it and click next. Please note that installation will give you warning that VHD can’t be booted, but ignore that and go ahead with the process. After selecting that VHD, the Windows should be installed. Same Personalize, Wireless Settings and Sign in Window should show there.
Part 3: Things to take care (Recommended)
In rear cases, Window might not end with successful boot when external disk would be disconnected. You will obviously want to avoid this i have possible solution to resolve same problem. Here is how it goes:
Step 1: Firstly, Boot into the Windows 7 and then run msconfig
Step 2: In the Boot tab you must see the following codes:
Windows 8 Default OS
Windows 7 Current OS
Just select Windows 7 and press to make it default then following should be displayed:
Windows 8
Windows 7 Current OS, Default OS
With the above solution, you won’t need to connect every time the external hard disk, whenever you want to boot only Windows 7. Now, you can use Windows 7 normally even when external disk is not connected, as Windows 7 boot loader would work to boot correctly in this condition. I hope tutorial was useful for you, if you have any comments or queries, then do not hesitate to comment at the below form, we’ll try to address as quickly as possible.
You’ve probably heard of people “rooting” their Android phones. If you’ve ever wondered how to do that yourself – or wondered why people would bother – you’re in luck. You can root your Android in just a few minutes.
After rooting your device, you have full access to the entire system and can run special types of apps that require root permissions. These apps can disable bloatware, control app permissions, enable tethering, and do lots of other cool things.
What is “Root,” Anyway?
Android is based on Linux. On Linux and other UNIX-like operating systems, the root user is equivalent to the Administrator user on Windows. The root user has access to the entire operating system and can do anything. By default, you don’t have root access to your Android device, and certain apps won’t function without root access.
With root access, you can disable the bloatware that comes with your phone, manually deny app permissions, run a firewall, access the entire file system, or tether your device, even if tethering functionality has been disabled. You’ll find many apps that require root access in the Google Play store (formerly known as the Android Market), although they won’t function until you root your device.
Rooting isn’t mandatory – you only need to root your device if you want to do things that require root access.
Warnings (WE DONOT TAKE ANY RESPOSIBILITY FOR THE MALFUNCTION OF YOUR TABLET)
Before you root your Android phone or tablet, there are a few things you should be aware of: Warranty – Some manufacturers assert that rooting voids your device’s warranty. However, rooting will not actually damage your hardware. You can “unroot” your device and manufacturers won’t be able to tell if it’s been rooted. Security – Google Wallet, in particular, has a vulnerability on rooted devices that could allow other apps to access your PIN and other wallet information. Google Wallet displays a warning message if you run it on a rooted device. If you’re one of the few people using Google Wallet for NFC payments, you may want to reconsider rooting your device. Bricking – Rooting a device is a very safe process. However, there’s always some danger of “bricking” a device when you go outside the normal parameters and hack around with it — particularly if you’re trying to root a device or operating system version not supported by a tool. “Bricking” refers to breaking the device, making it about as useful as a brick. When you root, jailbreak, or install a custom ROM, or otherwise hack around, you do so at your own risk. It’s a good idea to do a little bit of research first and see if other people report success rooting your device.
Setup
The actual rooting process itself should only take a single click. However, you’ll need to do a few quick things first:
Download and install the Java JDK and Android SDK on your computer before continuing. Java must be installed before the Android SDK.
Enable USB debugging on your Android. On the device, go into the Settings screen, tap Applications, tap Development, and enable the USB debugging check box.
Connect your Android to your computer using its included USB cable. Don’t mount the device’s SD card on your computer – just plug it in.
You’ll also need the USB drivers for your phone or tablet installed. SuperOneClick itself should be able to automatically install the appropriate drivers – however, if this fails, you’ll need to download and install the appropriate drivers from the device manufacturer’s website.
Rooting With SuperOneClick
We’ll be rooting with SuperOneClick here. It’s a single-click way to root that supports a wide variety of different devices and should work for most people. If SuperOneClick doesn’t support your Android device, head over to the Android Development and Hacking forums at XDA Developers. There are subforums for most Android devices – type your device’s name into the search box and you’ll probably find information from other people that have successfully rooted it, perhaps by using another tool.
You can find download links for SuperOneClick at shortfuse.org, SuperOneClick’s official website. After downloading it, run the SuperOneClick.exe application.
Click the Root button in the SuperOneClick window and SuperOneClick should do the rest.
The process will take a few minutes. If you run into a problem, you might want to check the XDA Developers forum for your device, which we mentioned above, or run a Google search.
Restart your Android after rooting it.
Superuser
SuperOneClick automatically installs the SuperUser binary, which is also available from Google Play. Whenever an app on your device attempts to gain root permissions by calling the su command (just like calling the su command on Linux) you’ll be prompted to allow or deny the request.
Open the Superuser app to control the saved permissions and configure Superuser.
Now you’re free to install and use apps that require root access
Windows 7 is Engineered for speed. Special attention has been given by the Windows team for making Windows 7 faster than the previous operating systems. Windows 7 is much faster than Windows Vista, but even then most of us don’t get satisfied with it. There are many who still have their old PC. Installing Windows 7 on them wont be as soothing as they would work with XP and Even with latest hardware’s installed some users are still avaricious for more performance. We could optimize Windows 7 to the maximum possible extent to squeeze out extra performance from it. So, for all the extra performance lovers, here is the Ultimate Guide To Speed Up Windows 7.
I can guarantee you that after following this guide and implementing the listed recommendations on your PC, you’d definitely experience some performance gain.
The bare Minimum Requirements You need To Run Windows 7
1) 1GHz processor (32- or 64-bit)
2) 1GB of main memory
3) 16GB of available disk space
4) Support for DX9 graphics with 128MB of memory (for the Aero interface)
5) A DVD – R/W drive
Even if you don’t have own a DX 9 capable graphics card its okay, because our target is performance and not the ” Eyecandy “. But if you need the aero experience, you’d definitely need a powerful graphics card.
If you’re on windows 8, check out our exclusive guide to
So, lets start The Ultimate Guide to Speed up Windows 7
Disabling the Search Indexing Feature in Windows 7
Right Click the “Computer” Icon in the desktop and select “Manage”.
Click “Services and Applications” in the “Computer Management” window.
Click on “Services”.
You’d see a lot of services being listed inside the window. Find “Windows Search” from the list.
Right Click on “Windows Search” from the list and choose “Properties”.
The “Windows Search Properties Window” will open up. From “Startup type” click on the drop down menu and choose “Disabled”.
Click “Apply” then “OK” and that’s it. The Windows 7 Search Indexing Feature is now disabled.
Most Windows 7 users are likely to do less file searches in their system. The Search Indexing service in Windows 7 will index and keep track of the files, so that they could be found out quickly when required at some other time. This feature is useful only if you perform frequent searches on your system.
For occasional file searchers the Search Indexing service in Windows 7 is a total resource hog. It unknowingly eats up your system resources in the background. If what you need from windows 7 is maximum performance, then i would certainly recommend you to disable this resource hogging Windows 7 Search Indexing Feature.
If you’d like to completely disable the search indexing feature in Windows 7 you may set the Search Indexing Service to Disabled (See the above method about disabling unwanted services).
Disable the Aero Theme on Windows 7
Right Click on your Desktop and select ” Personalize ” click the Window Color Tab.
Uncheck the Box saying ” Enable Transparency ” and then click on ” Open classic appearance properties for more color options”.
You may also Apply a Standard or Basic theme from the previous window. The Standard Windows 7 theme is more preferred as its gives a neutral look than the classy windows old theme.
The aero user interface certainly adds some ” Eyecandy ” to Windows 7 but it requires a quite powerful hardware to run smoothly. Older graphics cards would be squeezed to their maximum when aero is forcefully enabled. So why dont we just avoid the Windows 7 aero if what we care more is about speed and performance in Windows 7? So Disabling the Aero in Windows 7 certainly adds an extra speed boost to it.
Disabling the aero theme in Windows 7 will really speed things up as the hardware could now be allocated more resources and you’d get an idea by looking the memory consumption when aero is turned on and off.
Disabling the Unwanted Visual Effects in Windows 7 to Speed Up more
Right click on ” Computer” and select “Properties” from the right click menu.
Click on ” Advanced System Settings ” from the left pane to open up the ” System Properties ” window.
Select the “Advanced” tab from it. Then Under ” Performance ” click ” Settings “. Choose ” Custom: ” Options From it.
Now un tick all the options (Choose “Adjust for best performance“) and select only the last four options (actually three are preferable you may un- tick the second option out of the last four). Take a look at the screen shot below.
Now just logoff your system and login again.
Even though we have tuned off the aero effects in Windows 7 still there are many unwanted visual effects that could well be safely set to disabled to speed up windows 7 even more. After the login, you’d notice a speed difference now.
Disabling the Unwanted Services to Speed up Windows 7
There are many services in windows 7 that we dont require for our daily use though there are some exceptional cases though. Services such as “print spooler” are used only when there is a need to print a document. If you does’t own a printer, you could safely turn off that service in Windows 7 and turn it on only when there arises a need to take a print.
I have previously prepared a,
Disabling the unneeded services in Windows 7 can really speed up the system boot time too.
Disable the User account control (UAC) Feature in Windows 7
Disabling UAC is recommended for advanced users only its not recommend doing it if not.
From the Control Panel open the ” User Accounts and Family Safety ” > User Account.
Click the User Account Control settings link.
Now just Drag the Slider towards “Never Notify”.
Click “OK” and Reboot your system.
The User account control (UAC) feature in Windows 7 is very annoying for experienced windows users and for others it could protect your pc from harmful virus activity etc. If you do software installations more frequently on your system, turning off the uac feature would definitely save you extra time.
SetUp the Windows 7 Ready Boost Service for an Extra Speed Boost
To configure the Ready Boost Feature in Windows 7 you need to have a High Speed Flash/USB or Pendrive with you which is ready boost compatible.
After plugging your pendrive, open “Computer” > Right-click the on USB Drive/Pendrive > select “Ready Boost” tab > tick the “Use this device” checkbox.
You may configure the amount of space on your USB drive/ Pendrive to be used as Ram.
The ready boost feature in Windows 7 will help you to use your flash drive or pendrive or USB drive as Ram there by improving the performance and speed of windows 7 greatly. You’d certainly experience it when launching bulky applications such as Adobe Photoshop etc. Note : Ready Boost would only be of benefit for systems which have low amount of ram installed (less than 1GB). For others it doesn’t make a difference.
Turn off Unused Windows 7 Features
Open up ” Programs and Features ” from Control Panel.
Click the ” Turn Windows features on or off ” from the left pane.
Now uncheck all the Feature that you don’t use in Windows 7 and restart the system for the changes to take effect.
There are many features in windows 7 that we often don’t use. Disabling these unused features in Windows 7 would help in speeding things up.
Speeding Up, Tweaking and Optimizing Your SSD
If you’ve got a new ssd for your system, then you’d definitely consider checking out this guide which explains 9 tweaks to properly speed up, optimize your ssd and prolong the life of your ssd, while getting the best performance from it.
The guide have some added tips which includes, using a ram cache for speeding up your disk performance, enabling caching etc. So be sure that you dont miss out those awesome tweaks.
Disable the Windows 7 Sidebar (The Gadgets)
Right click on the sidebar and choose ” Properties “.
On the properties windows untick the check box showing ” Start sidebar when Windows Starts “
From now on windows sidebar won’t start when windows 7 start up.
Disabling the window 7 sidebar help you free up resources and gain a few more seconds during start up time.
Disable the Aero Peek and Aero Snap features in Windows 7
Aero Snap will help you to maximize, minimize and resize the windows just by dragging and dropping it into the screen corners.
I dont advice to turn it off as the Aero Snap feature really helps to speed up working with windows by arranging them side by side. But, if you are not a regular user of the same, you may proceed by turning of aero snap in windows 7.
Open the Windows 7 ” Control Panel ” and double-click on ” Ease of Access Center ” icon.
Now click on the ” Make it easier to focus on tasks ” seen at the bottom in there
Now untick the check box saying ” Prevent windows from being automatically arranged when moved to the edge of the screen ” .
Right click on the Windows 7 taskbar and select ” Properties “.
Now untick the ” Use Aero Peek to preview the desktop ” option from there.
That will now disable the Aero Snap in Windows 7.
Now To Disable the Aero Peek feature in Windows 7
The Aero Peek feature in Windows 7 helps you to peek through all open windows by hiding all other windows and showing only the outlines of all windows. Aero Peek is similar to the ” Show Desktop ” Feature in XP and Vista.
If you have followed step 3 then Aero Peek will be automatically disabled. If not,
Right Click the Taskbar and choose Properties. Un-select the ”Use Aero Peek to preview the desktop” option.
The aero peek feature will now be disabled in windows 7.
Change the Power Plan To Maximum Performance
Double click the ” Power Options ” in the Control panel.
Click the down arrow showing ” Show Additional Plans ” to see the ” High Performance ” power plan.
Now just activate the ” High Performance ” plan and that’s it.
You may go for the advanced settings for further tweaking if you want.
The Power settings in Windows 7 is not automatically set for maximum performance. By default the power plan in Windows 7 is set for a balanced performance with energy consumption on hardware. So you may not get the optimal performance from windows 7 if this is the case. So we need to change the power plan to High Performance Mode.
Disable the Thumbnail Preview Feature to speed up File browsing in Windows 7
For disabling thumbnails in Windows 7,
Double Click on ” Computer ” >click on the “Organize” drop-down menu and select the “Folder and Search options”
Under ‘Files and Folders’ section, go to the “View” tab and tick the check box showing “Always show icons, never thumbnails” checkbox.
The thumbnail preview feature in Windows 7 will show the small thumbnails of the contents of a folder instead of showing it’s icon. But this feature really do take up some system resources. So by disabling the Thumbnail Preview feature in Windows 7 the file browsing in Windows 7 explorer can be speed up.
In order to maintain Windows 7 Performance and keep it up in Top Shape there are some very essential software’s that could be of great help to Speed Windows 7. I will list some of them here. You may download and install these utilities. Make sure that you run these utilities at least once in a week. If you are regular at this, Windows 7 will be in top shape every time.
You may check this post which i have prepared earlier about the Top 5 Tools To Speed Up Your PC. http://www.computingunleashed.com/2009/05/top-5-tools-to-speed-up-your-pc-to.html. You’d get more idea reading the usage of the software i mentioned above.
Registry Tweaks to Speed Up Windows 7
Here are some registry teaks that can be used to speed up windows 7 even more. I have complied only the safest tweaks that can be applied to your PC. Apart from speeding up windows 7 they will also add some functionality in windows like adding Copy to / Move to in right click context menu to speed up your daily tasks.
If you have the full licensed version of Tune Up Utilities software, i’d say it’s one of the best tools to keep Windows 7 in top shape.
Turn OFF Windows 7 Password Protection To save a few More Seconds!!!
If you’ve set a password for accessing your user account in windows 7, then you need to enter it each and every time you login to windows. Logging into windows automatically without entering any password will save you a few seconds more. If you are the only person who use your computer then i’d recommend to turn this off. If that is not the case you may skip this step. How to Automatically Logon to Windows 7 without entering any username or password
Turn OFF Windows 7 Screen Saver and Wallpaper
To Disable The Screen Saver and Wallpaper in Windows 7,
Right click on desktop and choose “Personalize”.
Click the Screen Saver link ” From the Screen Saver drop down menu, Set it to “None” and click “Apply” and then “OK”.
Now click on “Desktop Background” link.
From the “Location” drop down menu select “Solid Colors” and pick one color and click “OK”.
In order to display the wallpaper and screen saver the system needs some memory. So by disabling those two we can save a few Mega Bytes of memory.
Disable Unwanted Start Up Items and Speed Up Windows 7 Start Up
Type ” msconfig ” in the “RUN” option from start menu press [Enter] to open up the System Configuration Utility.
Now navigate to the “StartUp” tab.
Untick the Entries which are not needed
This really matters when you have installed a lot of softwares on your PC. Many software such as AcdSee will run services such as device detector etc during the system start up. These are of no use actually for most windows users. So preventing such services from starting up during the start up of windows 7 can result in quicker start Ups. This will actually save some seconds during windows 7 start up.
Disable Unwanted System Sounds in Windows 7
To disable the system sounds in Windows 7,
Type mmsys.cpl in RUN From the Windows 7 Startmenu search box and press [Enter].
Navigate to the “Sounds” tab.
Now from under “Sound Scheme:” select “No Sounds” > Click “Apply” > “OK”.
You may keep some of your favorite sounds turned on if you want, but sounds played during the Windows 7 start up, shutdown, Logon, logoff, start navigation etc should be set to none if you want some real speed boost.
In order to play the sounds you hear in windows 7, system resources are being utilized. So if you could disable these sound effects, that would successively free some system resources too.
Thats it! following all these steps will certainly boost the speed and performance of your windows 7 operating system.


 Youtube – You know that site with videos and all. Yeah! It turns out that its quite popular and you happen to visit and use it quite often. Instead of just searching and playing here are some top Youtube URL tricks that you should know about:


